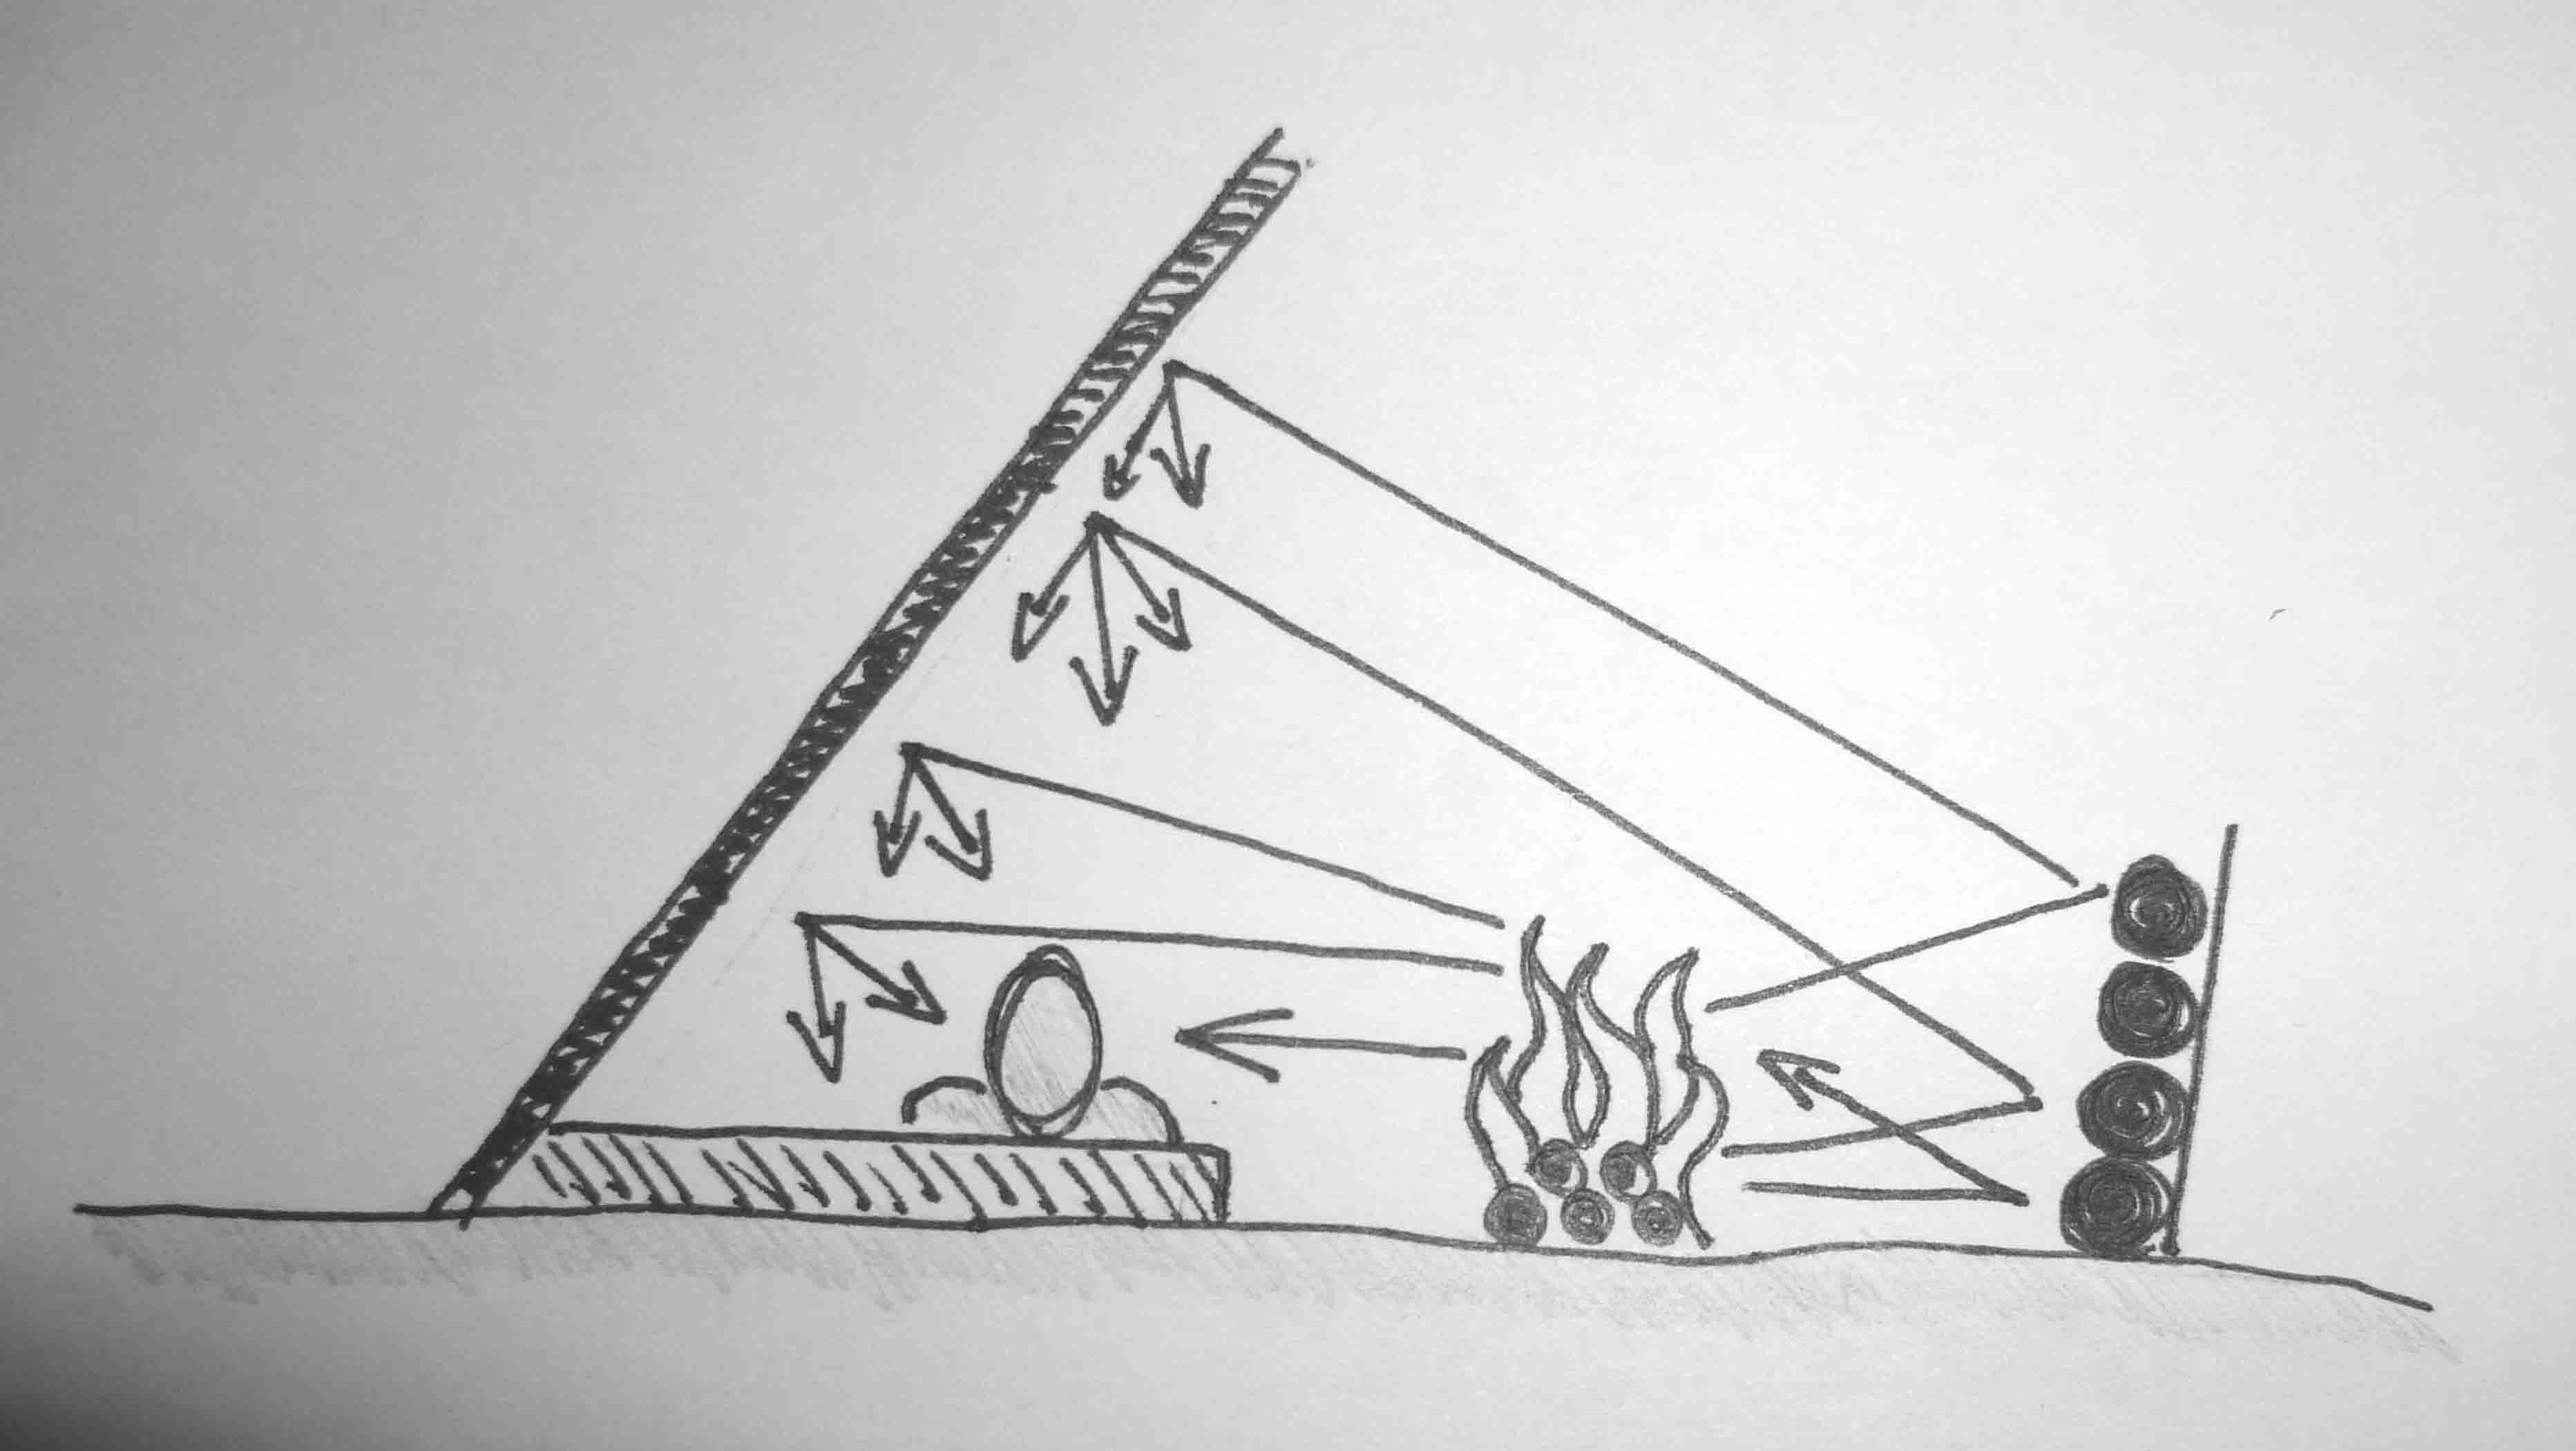
The dakota fire hole is an efficient, ‘low’ impact stove constructed of a main chamber, dug into the ground, and a secondary air hole. The fire, when hot, sucks the air in through the windward airhole to superheat the fire in the chamber causing an efficient burn in term of wood used, high temperatures and very little smoke. Because the flames and embers are below the ground it also makes for a fire that excels in stiff breezes and has a low visual imprint on the landscape. Great if you don’t want to be seen! When cooled and filled in with the turf used to excavate it it leaves very little visual clue too.
The fire hole is very easy to make in non-saturated, non-combustible (ie NOT peat) and non-stony soil. Just a digging stick and your bare hands will suffice. This one here took 10 minutes to make and a couple of minutes to light.
Dig a hole about 20-30cms wide and about 30cms deep Hollow out the chamber into a bottle shape to create more space for fuel.
About 30 cms away and on the windward side of the main chamber dig a secondary, sloping air hole the intersects with the bottom/side of the main chamber. Make the hole about 15cm wide – or enough to get your arm down. The wind will help feed the fire oxygen to superheat it and create a more smokeless burn.
Cut four bits of green wood for the edge of the main fire hole – this can be used to mount your billy can – allowing for airflow and also to enable the feeding of fuel.
Once finished then saturate hole, fill in and re-turf.
Piptoporus betulinus, is also known as the birch polypore or razor strop fungus. It is one of the most common polyporous bracket fungi and grows almost exclusively on birch trees. It is therefore an inhabitant of northern forests around the world. And as such an ideal resource for those travelling in the wilderness.
Its bracket-like fruiting bodies can last for more than year and although it is classed as inedible (due to its toughness and bitterness) it is medicinal and has been used both externally as a ‘band-aid’ and topical application for inflamation and internally, as a tea, for a range of conditions including whipworm.
The surface and the layer beneath the surface has been widely used to put the fine finishing edge on a razor, a knife or an axe. In fact cutting these will dull your blade quite quickly.
This was the fungus that was carried by “Ötzi the Iceman” – the 5,000 year old mummy found in the Tyrol – and points to its long-standing use in fire-lighting. It can also be used as a ‘smudge’ (as in smudge stick or smudge pot) as it smoulders, giving off a pungent smoke that effectively repels insects.
Due to the host of uses this fungus surely deserves to a place in the Wilderness Guide’s Survival Hall of Fame.
As a plaster
The fungus has anti-bacterial, anti-viral, anti-septic, anti-inflammatory and absorbant properties that when used externally can make it a useful plaster for small cuts and abrasions.
As a blade strop
Slice the fungus, dry it and either use as is or fix it to a board or backing. Here a piece is glued to the back of my bow-drill hearth-board.
As a tinder
Either finely flaked, powdered or sliced it takes a spark from a modern firesteel.
Or as an insect-repelling smudge
Either sliced finely of even used as a thick block BPF smoulders and gives off quite a bit of thick smoke which has proven very effective to repel insects from an area. It needs a still, windless environment to work well. I have also noticed that there is a tar-like residue left on the pot/dish after burning which points to it containing tar, which might have possibly been sequestered from the birch itself and its oil-rich bark.
Comments Off on survival hall of fame: the birch polypore fungus | posted in campcraft, fire, foraging, nature
Feather (or fuzz) sticks are useful when small tinder is scarce. All you need is some standing dead-wood that can be split and then shaved, with your knife, into curls. The finer the curls the better as these can easily take a spark from a modern firesteel or with the addition of a small piece of charcloth use a traditional flint and striker to ignite these curls.
click on the video below to see how this is done
Comments Off on fire: the feather-stick | posted in campcraft, fire
The criss-cross fire lay is a very important and flexible fire. It is quick to ignite, it provides a lot of heat, a decent amount of light and a good ember base for cooking. It can be built in advance almost in entirety before it is lit and the way the sticks are placed allows for high air flow and therefore it ‘takes’ very quickly: making it an ideal pre-prepared emergency signal fire.
The principles of the fire are simple. Place two retaining logs either side to create a chamber for the tinder and fine kindling. This can be placed on a raised bed of sticks to keep it off the damp woodland floor and also improve airflow. Next arrange a small row of sticks over it, then at 90 degrees arrange another, possible slightly bigger sticks…and so on. When the fire is lit the fire climbs quickly through the small sticks which in turn light the larger ones. When the fire really takes hold then as it collapses it ‘self-feeds itself more fuel from above.
Of course you do not have to build it in advance but create a small fire then lay sticks cross-cross over the fire to build it up. The resulting embers provide one of the best cooking fires or can be raked out to convert to a long log fire for the night.
If you use this fire as the basis of an emergency signal fire then construct the fire, possible even with an addition of a small pit underneath to further increase air-flow and ensure ultra-quick ignition. Leave a decent chamber for the tinder to be placed. Don’t worry about increasing the size of your sticks too much in the criss-cross layers above – you want the sticks to all catch quickly – so smaller ones may do that better than big logs. Over the pre-prepared fire-lay rig up a greenwood tripod and lash a simple mezzanine frame just above the top layer of the fuel. On this loose, airy platform place plenty of green leaves and herbage. This gives you the option to make it a smoke signal fire (green leaves create lots of smoke) AND keep the fuel dry underneath for when you want to light it.
.
Comments Off on fire of the day: the criss cross | posted in campcraft, fire
The Hunter’s Fire uses two parallel logs with the fire in between. The logs act not only as fuel, a windshield but also as a platform to place a pot above the flame. An adaptation of this fire is a ‘Hunter’s V’ which places the wood wider at one end and narrower at the other. The open end can be placed more into the wind and creates a narrowing channel that accelerates the airflow thereby increasing the heat/intensity at the narrow end. This is great for damp wood but also gives you a cooking platform that has variable heat from one end to the other.
Comments Off on fire of the day: the hunter’s fire | posted in campcraft, fire
This fire is a denizen of the cold places. It is a key piece of survival kit in the boreal north. It is mainly used as an effective form of heating at camp. Although you can happily cook over it (its length means that it is ideally suited to a high-bar pot suspension rig / double tripod) it excels in the amount of heat it kicks out sideways down its entire length. Having a long-log fire the length of a sleeping person ensures that heat is radiated down the entire length of the body. Pair this fire with a way of reflecting radiated heat back at you from the other side of the fire – such as using a log fire reflector wall and having the back wall of a shelter behind you can ensure that all heat is bounce back onto you, over you, behind you, and if you raise your sleeping platform, even underneath you. I have slept out, without a sleeping bag in -14 C using a long log fire in this way. As long as you remember to feed it at certain times during the night!
radiated heat bouncing back into the shelter
To make this fire you should start a regular, small fire and build up the ember base (for instance criss-crossing the firewood helps in this process). Build up a significant bed of embers then ‘rake’ it out into a length and place three lengths of wood onto the fire to encourage it to ignite and for the flame to move outwards along the logs. Sooner or later you will be able to put quite sizeable diameter logs of 6 foot length onto the fire – you don’t need many, two or three at a time. They should burn for hours. The longest long log fire I have ever used was for 8 people, sleeping both sides of the fire and was around 20 feet long – showing that you can keep the cutting and chopping of wood to a minimum.
Comments Off on fire of the day: the long log | posted in campcraft, fire
A star fire is a long lasting fire that provides good embers for cooking and heating water and also provides a platform to balance a cooking pot on obviating the need for a cooking suspension rig. It also uses less wood than some fires and therefore is useful in areas where firewood is in short supply (or high demand). Its low flames, often concealed in the heart of the fire make it more discreet, safe and controllable.
The beauty of it is that you can vary the fire by pushing the logs inwards or pulling them outwards. Also by doing it this way can sometimes avoid much cutting or sectioning of the wood as you feed the fuel into the fire lengthways as needs.
The process to make one is simple: build a normal fire using tinder, kindling and fuel then arrange four similar sized logs so they meet in the middle. Push the logs in as they burn. Occasional feeding of the fire with additional kindling and fuel to maintain the burning of the larger logs is often necessary.
Comments Off on fire of the day: the star fire | posted in campcraft, fire
Every time a fire is created it is like a birth of a new child. It is a time of excitment, uncertainty and it needs your undivided attention.
Although fire is the simple, but heady mix of heat, fuel and air there are so many different factors within these that make it unpredicatable and infinitely variable each time one is lit. I have made fire hundreds of times but each time I feel like its my first (child) and I am filled with trepidation.
Growing a fire is like growing a person or at least loving them. You coax it, feed it, encourage it to grow, you adjust, add, subtract, shield, protect…nuture it from spark to ember, ember to flame, flame to heart(h). Too much attention and you can smother it, making it too big too quickly can give it a weak heart. Adding different fuels at different times can grow the ember-base for a durable and long-lasting bed of coals that can be re-kindled, like a friendship even when much time has passed – the embers lie quietly glowing in the ash ready for your gentle breath.
Building a big fire can give it a huge appetite. You can become a slave to feeding its overweening needs – too hot to be comfortable, too hungry to share its flame. Make it too small and the wind, rain or cold can extinguish it like a neglected love.
But the time will inevitably come when you no longer feed it and watch it die down, becoming cold at the end of its life. It is with great sadness when I extinguish a fire or throw the last log on.
You bring life to fire. You care for it. In return it gives you light, heat and hope. It can help guard you, feed you and shelter you. You are its creator and custodian but in return it gives back as much as you give it. Fires are like people, like relationships, like parenthood, like life.
For another perspective on fire then please click here
Comments Off on giving birth to fire | posted in fire
The Burtonsville Cooking Rig is a quick, simple and very effective method of hanging a pot over a fire.
the burtonsville cooking rig in action
It uses four sections of wood and with careful selection can be made out of one branch. The beauty of it, aside from its gravity-defying appearance, is that the pot can be varied in height over the fire so it enables you to fine tune your cooking temperatures, because the hanger is on a ‘pivot’ it keeps the pot level on sloping or uneven ground, and it only needs a knife to make too. Ideal!
Making it requires one long length of branch as the main suspension. The working end is cut to a wedge and has a pot-hanger ‘seating’ hole made in the upper side of the wedge. This helps the pothanger to balance and stay in place.
The main suspension limb is secured in the ground at the other end either by a forked branch (y-section) or two small straight pieces crossed over to do the same job. The middle of the main suspension limb, to give its height and angle, passes over another, taller y-section. This similarly could be made out of two straight branches that are hammered into the ground and crossed over.
The adjustable pothanger is made from carving a series of x-notches (click here or on the video below to see a demo of how to cut this x-notch). These notches are carved along its length – and are to adjust the height of the pothanger over the fire. The notches fit into the ‘seating’ hole in the wedge at the end of the main suspension bar. Once seated and with a pot on the end it is surprisingly stable.
At the end of the pothanger another notch is carved – but ensure that it is carved the OPPOSITE way up to the other notches otherwise it will not hold the bail-arm of the pot! Also carve it on the same side as the other notches or it might have a tendency to shift its centre of gravity and make the pothanger twist in its seat when fully loaded. Make sure you carve this notch about two finger widths from the end of the stick to it give it a bit of strength but it not too long so that it interferes with the contents of the pot or the lid.
Bon appetit!
Comments Off on the burtonsville cooking rig | posted in campcraft, cooking, fire
It might be cold, wet and ‘miserable’ beyond the speckled panes of your kitchen window but its worth putting down the 10th mince pie and the 8th glass of sherry (or in my case Hudson Bay Spruce Beer) and grab a friend or family, brace the inclemency and blow those cobwebs away with a walk deep into the woods. But take your time, pack some cake and tea, maybe stop by for a campfire and a five -minute brew before you return to the sterility of your ‘living’ room.
click on the video below to watch Eddie and Mark starting fire-by handrill, a five minute fire and a cup of tea (then leave no trace)
Below is a diary entry from a time, around Christmas, when I grabbed my son Eddie and went out for breakfast in the woods. It does not have to be an expedition. It can just be a morning or an afternoon. Don’t let having ‘no time’ put you off from grasping the opportunity. These moments are priceless.
“The weather was cold, damp and miserable. Fine drizzle peppered the windscreen as we gunned up the wide track, across the deep ruts and over the ridge to where the trailhead began. The deeper forest beckoned.
My back seat driver was Eddie, four-year old navigator and camp-chef for the day. Unusually we parked up on the crest of the valley and grabbed our kit from the trunk. Eddie looked the part, dressed in mini camo trousers and a ‘kerchief scarf. He even tried to whistle a ditty.
The first thing you have to recognise when having a young-gun in tow is that you ain’t going anywhere quietly. We were not fifty yards from the car when a dozen fallow deer broke cover, bolting across the high pasture. Shame. Eddie called out, in his little musical voice, for them to remember to bring Santa. Bless ‘im.
We wound our way along the old green lane: part stream-bed part old, rutted highway, past the ruined crofters cottage and down to the valley bottom where the broad oaks and tapered ash yielded to a birch-ranked clearing matted with whisper dead fern. Just off stage the brook gushed in winter spate. A dead fallow lurked in the shallows, reminding me of where not to fetch our water.
The drizzle intensified into marching curtains. The tarp was up in no time. The kit out the way but still down in the mulch. Eddie and I traversed the brook at the ford and climbed briefly into a stand of dormant larch to collect tinder. The tiny snaps sounded like gun-fire in the sombre, dank silence. Once back in camp we busied ourselves grading the firewood. Eddie will make a fine quartermaster one day. Eddie scavenged some birch bark from around the clearing and soon we had a crackling fire. It even promised to give a cherry glow to the camp: striking against the monochrome sky.
We discovered a small spring oozing from the side of the valley. Eddie pushed an angled stick into the muddy strata to coax the trickle away from the mud n’slate bank. It worked, and soon we had a canteen of clear spring water.
Back in camp Eddie fed the fire, gingerly at first then with growing enthusiasm nearly smothering it with attention. He joined in the blowing as we gently nursed it back to health. But maybe it was my fault for letting such a young fire go for so long whilst we went in search of water. Breakfast soon followed – eggs, bacon, sausages all cooked in a pan on a trivet. Eddie turned the bangers, I flipped the eggs. Piping hot water, boiled at the end of the pothanger, made some thick, unctuous hot chocolate for Eddie and a ‘raise-the-dead’ coffee to help give me some zest. I looked at my watch, three hours had passed and Eddie was sitting with his little knife whittling a stick….not a bored hair on his damp little head, absorbed absolutely with his task. He even helped pack up and ‘leave no trace’; scattering cold ash to the four corners and raking leaves over where the fire once stood.
We hummed to each other all the way home. Him pointing out tree roots and burrows, I stumbling over them with the kit. Even the rain did not dampen our spirits. We hardly noticed. Before we knew it we were back. Muddy clothes in a heap and Eddie telling his mum all about ‘his great cook out’. He asks me all the time when are we going again. And can we track deer next time aswell.
I’ve captured his imagination. The hard work is done.”